CAESAR Registration Tip Sheet
Getting Started
Step 1: To access online registration, login to CAESAR. Your Student Homepage appears.

Step 2: If you have any “Holds” or “To Do” items on your account, a notification will be visible on your Tasks tile. Click on the Tasks tile to access more detail, along with links and instructions on how to remedy them. You must take care of holds related to registration before you can enroll.
Manage Classes
Step 1: Review the time and date that your registration appointment begins. Click on the Manage Classes tile
The NU Manage Classes page appears.

Step 2: Select “Enrollment Appointment/Dates” from your left-hand menu.

Step 3: To use enrollment functions, click on the “Shopping Cart and Enroll” menu item to reveal the Shopping Cart and related enrollment actions. (Refer to our separate Web pages for more detailed instructions to: Search for Classes; Adding Classes; Dropping a Class; Editing Classes; Swapping Classes; and Adding Yourself to a Waitlist.)
Find Classes (Search for Classes) and Plan Your Schedule
Before you register, you might plan an ideal schedule and list of alternative classes. It’s helpful to have the 5-digit class numbers ready when your registration appointment time begins. Class offerings and numbers are in both the pdf version of the schedule and on CAESAR.
Step 1: From your student homepage, select the Manage Classes tile. Next, select Class Search in the left-hand menu. The Search for Classes page appears. You may select different search criteria on the page for any of the values provided. [Note that the Term and Course Career fields will fill in automatically based on your Campus Preferences. You may view or edit your Campus Preferences by selecting My Preferences from the Actions List, and then selecting the menu item called Campus Preferences.]
Enter Course Subject and Course Number criteria (if appropriate) and press the Search button. Or, click on the Additional Search Criteria button or Class Attributes/Requirements button ![]() to expand your search options.
to expand your search options.
Step 2: Select any additional desired search criteria in the fields provided. Narrow your search by setting criteria in multiple fields. You must select at least two criteria such as Course Subject, Catalog Number, Description (course title), or Course Career in order to perform a search.
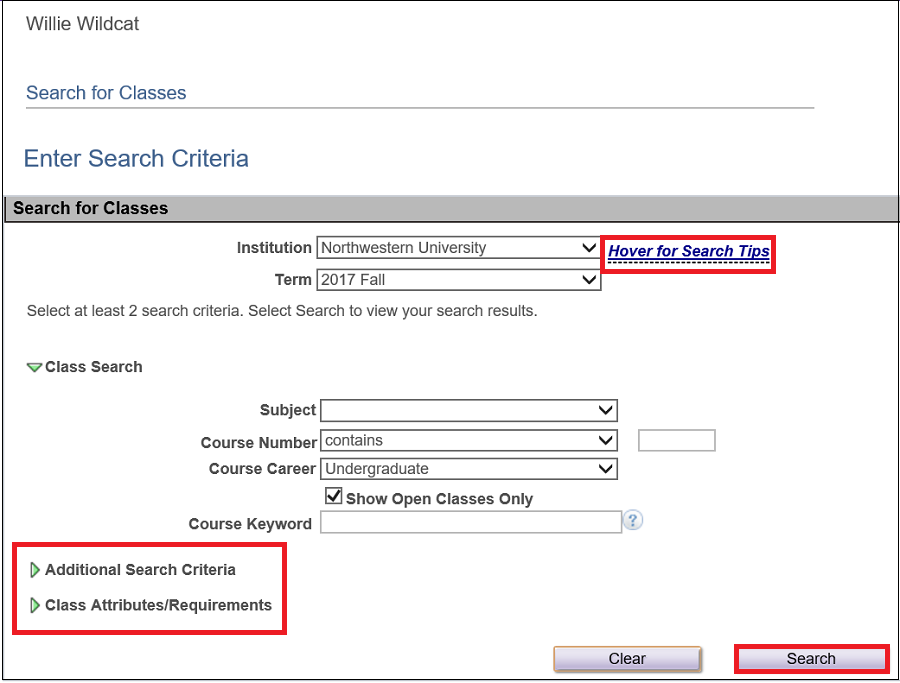
Step 3: Once your search criteria are set, press the Search button. A list of results matching your search criteria will be returned in the Class Search Results page. [Note: The more restrictive your search, the faster this list will appear.]
Step 4: If searching before your registration appointment, note the 5-digit Class Number (Class Nbr) and meeting times of classes that you want to enroll in on the "Course Planning Worksheet" found at www.registrar.northwestern.edu/registration/. To view further information about a class on the search results list, click on the link provided in the section column. The Class Detail page appears.
Add a Class
To enroll, you can either add classes or swap classes. [Note: instructions for swapping classes are contained on a separate tip sheet.]
Step 1: To Add a class, click on the “Manage Classes” tile on the Student Homepage. The NU Manage Classes page appears.
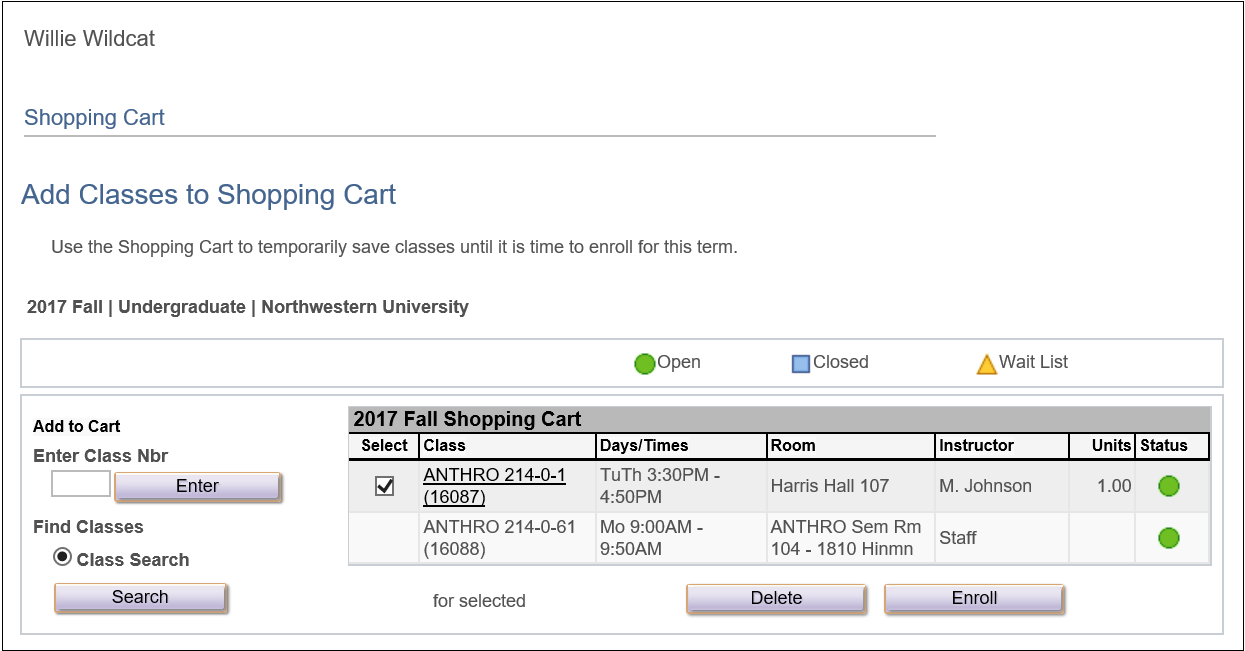
Step 2: Click on "Shopping Cart and Enroll" from the left-hand menu. The Shopping Cart - Add Classes to Shopping Cart page appears.
Step 3: Enter a 5-digit class number in the Class Nbr field and press Enter (or press Search to access the Shopping Cart – Enter Search Criteria page to search and select a course). If the class has a related component(s), such as a discussion section(s) or lab, they will appear beneath the lecture component. [Note: You must register for discussion or lab sections with the lecture. You cannot register for labs and discussion sections independently.]
Step 4: The Enrollment Preferences page displays registration options available for the class(s) in which you are enrolling, which you may be able to modify depending on the class. If permission is required for this course, you will need to enter the permission number in the Class Permission Nbr field. If this is a variable credit course, you will need to enter the number of credits that you will receive for passing the class in the Units field. Finally, when multiple grading options are available, such as "P/Not Pass", the Grading field will allow you to elect the desired grading basis. You may also place a check mark in the “Wait list if class full box” to be placed on a waitlist if the course is full and maintains an online waitlist.
To proceed to the next step, press the Next button.
Step 5: You have now successfully added this class to your shopping cart. The Add Classes–Select classes to add page now displays the following message and the contents of your shopping cart:
Step 6: Repeat the steps above to add additional classes to your Shopping Cart or press the Proceed to Step 2 of 3 button to move to the confirmation stage of the enrollment process.
Step 7: The Add Classes–Confirm Classes page displays the classes you’ve selected from your shopping cart to add at this time. Confirm your selections and click the Finish Enrolling button.
Step 8: When your transactions have been processed, the Add Classes–View Results page appears. Successful enrollments will display a green checkmark next to the class, and unsuccessful enrollments will display a red X next to the class. If a class addition or swap is unsuccessful, Errors will be displayed in the Message field.
Step 9: Press the Add Another Class button to add another class or press the My Class Schedule button to view and print a copy of your class schedule. Confirm that your schedule is correct, press the Printer Friendly Page link in the lower right hand corner and then print a copy if you wish. [Alternately, you can navigate from the Main Menu by selecting Enrollment > View My Class Schedule.]
Drop a Class
Step 1: To Drop a class from your schedule click on the Enroll link from the Student Center. The Add Classes–Select Term page appears.
Step 2: Press the drop link. The Drop Classes–Select Term page appears.
Step 3: Select the term and press the Continue button. The Drop Classes–Select classes to drop page appears.
Step 4: Select the classes you wish to drop and press the Drop Selected Classes button. The Drop Classes–Confirm your selection page appears.
Step 5: Review the page to confirm the course(s) to drop. Press Finish Dropping to complete the drop transaction or press Cancel to exit without dropping your class(es). If the action is successful, CAESAR will display Success in the Message field. If the drop is unsuccessful, Errors will be displayed in the Message field. Press My Class Schedule to review your new schedule.
Common CAESAR Icons
![]()
The Home icon takes you back to your homepage.
![]()
The Global Search icon allows you to search for items/pages that you have access to in CAESAR.
![]()
The Actions List icon allows you to view and manage your Preferences, access Help resources and Sign Out.