Tables
To create a table:
-
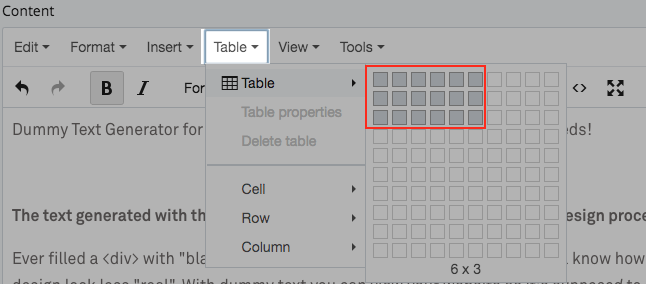
Place your cursor wherever you want to insert the table. Click the Table dropdown.
-
Select the desired number of rows and columns by moving your mouse over the grid.
-
After inserting the table, identify which cells should act as headers based on the table structure.
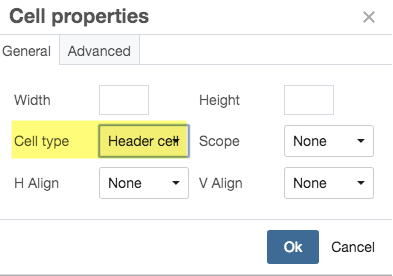
To mark cells as headers, select the appropriate cells, right-click, then go to Cell → Cell Properties.
- For a table with a header row, change:
- Cell Type to Header Cell
- Scope to Column
- For a header column, change:
- Cell Type to Header Cell
- Scope to Row
Use a header row when the top row labels the columns. See the example below:
Fall 2026 Course Schedule Course Instructor Meeting Time ENG 101 Dr. Martinez MWF 9:00 AM HIST 210 Prof. Lee TR 1:30 PM Use a header column when the first column labels the rows. See the example below:
Library Study Room Availability Room A Available Room B Reserved Room C Available - For a table with a header row, change:
-
Right-click anywhere in the table to view options for modifying the table. You can add or delete rows and columns, merge cells, or delete the table.
-
Add content to the table cells. Since the templates are responsive, the table cells will adjust based on the content.
-
After editing the table content, select the table and choose Table Properties from the Table menu in the WYSIWYG toolbar.
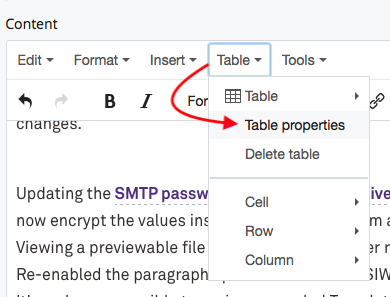
-
In the Table Properties popup window, check the Caption field and click OK.

If your site uses the V3 template, a blank caption field will appear below the table. If your site uses the V2 template, it will appear above the table.
-
Enter a title for your table in the caption field. This step is required for accessibility.
Note
- V3 sites have an additional social media bar that runs horizontally in the footer.
- You can also add a table caption during Cascade content checks. If a table is missing a caption, you will see an error under the accessibility tab during the content check. Go to the accessibility tab and click the fix option to add a caption.
- Do not use heading styles (H1-H6) inside tables.
- If you need help with this step or have a table with merged cells, email WebComm Support and we will walk you through the steps.