Videography Guidance
Video is one of the most engaging formats for storytelling. However, video production is also a complex, time intensive, and often expensive process, especially given the high standards for any Northwestern University material. Please consider carefully whether video is the best way to communicate your message. If it is, the guidance below can help ensure your videos are successful and consistent with the Northwestern brand.
Feature and Promotional
Style
- Attempt to shoot with natural, directional light whenever possible.
- Actors (or real people) should appear natural. Use neutral clothing that's appropriate for the setting, rather than Northwestern logo apparel — unless the video is about athletics. The Northwestern wordmark and purple apparel can be featured sparingly.
- B-roll is generally critical to maintain a viewer's interest in a video. What opportunities does your story have to capture footage of action other than the main subject(s) talking?
- If there is dialogue in your video, clean and clear audio is essential. If the speaker(s) in your video are difficult to hear or understand, the video will not be successful. Carefully placed lavalier microphones are best for capturing on-camera speakers, but boom mics or high-quality camera mics can also work in a controlled (i.e. quiet) setting.
Framing
- Avoid aggressive camera moves like whip pans that expose the camera work to the viewer.
- Use the rule of thirds to create balance and visual interest.
Event and Lecture
- When possible, use multiple camera setups so that you can capture both the performer and the audience well.
- Avoid complex supers that distract from or cover the subject of the video.
Self-Generated Video
Even before the COVID-19 pandemic, people are increasingly able to capture simple video of themselves speaking using readily available technology for inclusion in a larger video project, or as a simple way to make a short point in their own voice.
Filming Yourself at Home
Tips for Best Quality
The most important question is: where do you film? While technically you could film anywhere, there are three keys to keep in mind:
- Appearance
- Lighting
- Sound
Appearance
One of the first things you should think of when choosing a place to film is how the location behind you appears on camera. Keep in mind the style of video that you're creating and try to make sure the location makes sense for that style. Everyone will understand that these videos are being filmed from home, but it's always best to choose as clean and professional a background as possible. If you have a home office, consider filming from there. Otherwise any clean, clutter-free background will work. Try to avoid bright windows behind you.
Once you are on camera, everything about you communicates something. So always take a moment to consider what you are wearing, and whether those clothes are clean, crisp, and communicating what you intend. Be sure to clean your glasses if necessary and adjust your hair as appropriate. Simple makeup will generally improve anyone's appearance on camera. Also try to avoid tightly patterned clothing which tend to mess with cameras and screens alike.
Lighting
When you are choosing your location to film you must also consider the lighting in that spot. While it is not necessarily essential to set up special lighting equipment, do consider how the light in the space is falling on you, and know that natural light is always best if possible. Try positioning yourself so that light from a window is falling on you evenly, ideally from in front of you. Avoid having any bright lights – especially windows – behind you. The camera will always try to compensate to the brightest part of the frame, and if there's light behind you then your camera will struggle.
Sound
If you have people moving around and talking in your space, it's going to be hard to capture good sound. Most mobile devices and computers have decent built-in microphones, but they're designed to capture all the noise in a given environment. So, having a quiet space is essential for the microphone is pick up only your voice. Speak clearly and naturally when you film, just like you would in any public presentation.
Tips for Using the Best Technology
Your best devices for filming at home are:
- Current phone or tablet device (e.g. iPhone or iPad)
- Built-in computer camera
- Zoom
Mobile Device
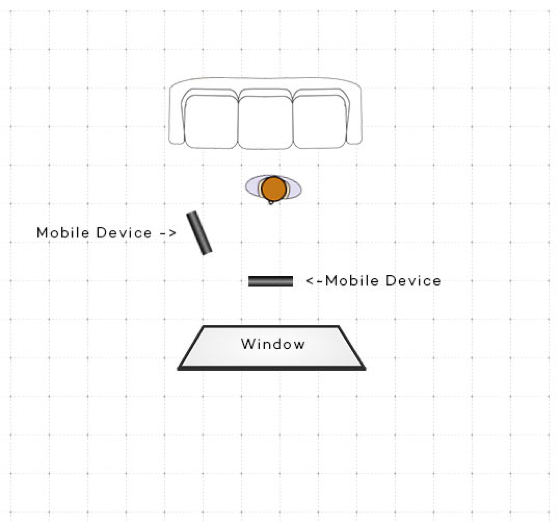
In terms of quality, a relatively current mobile device is the best way to go. The built-in cameras and microphones will give you the clearest image and sound quality. Find a steady surface to prop your device against. Consider using a stack of books or something sturdy to lean your device against. Asking someone to help is great if possible. Filming horizontally is a must! Having the device as close to eye level as possible is also ideal. If you have to film by yourself, turn on the self-facing camera, to be able to see yourself and make sure the shot looks as good as possible. If you have access to more than one device, and might be able to get assistance from a video editor, consider setting up a second camera. See image below for placement suggestion of second device:
Built-In Computer Camera
The built-in camera on most modern computers can work as well. Set up your computer as suggested above (stable and as close to eye-level as possible). Open the built-in recording software on your computer (typically the "Photobooth" app on a Mac and the "Camera" app on a PC). Be sure to set it to record video (not photo).
Zoom
Zoom is a great option if you are recording a conversation between two or more people. And while the video quality from a recorded Zoom will be lower in quality than video from a mobile device or a computer, it can easily get the job done for a solo self-recording as well.
To record a conversation between people, simply open Zoom, start or join a meeting, then select "record" on the bottom menu bar, and select "record on this computer" (unless you typically use the cloud). When recording, be sure to have your screen set in "gallery" view, not "speaker view," to make sure you get all the subjects in the frame at the same time. When you end the meeting, the video file will save to your computer.
To record yourself only, simply open Zoom, start a new meeting, select "record" on the bottom menu bar, and select "record on this computer" (unless you typically use the cloud). When you end the meeting, the video file will save to your computer.